A Family Favorite Passed Down
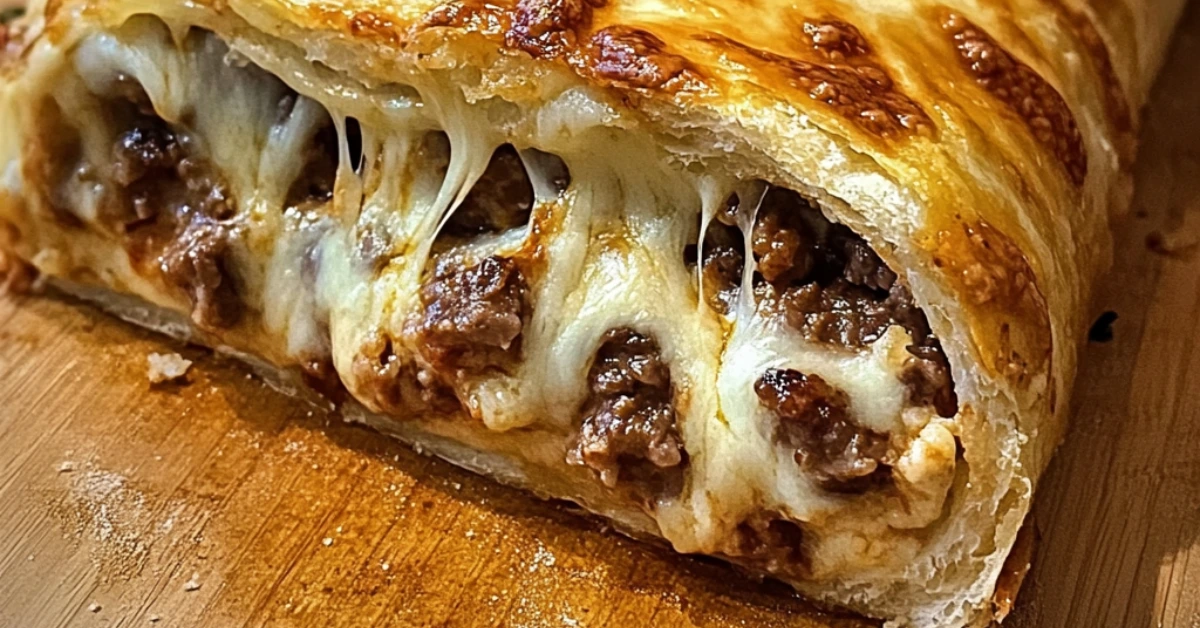
I still remember the first time I tried this cheesy stuffed pastry Recipe it was at my aunt’s house during a big family gathering. The kitchen smelled absolutely heavenly, and when she pulled out a tray of golden, flaky pastries from the oven, I knew something special was about to happen. The first bite was pure magic—crispy, buttery layers of pastry filled with gooey, melted cheese and perfectly seasoned meat. 😋
Curious about where she got the recipe, I asked her for the secret. She smiled and told me it had been passed down from her grandmother, who used to make these for every festive occasion. It was a tradition that brought the family together, and now, years later, I find myself doing the same. Whenever I bake these cheesy stuffed pastries, the warm, comforting flavors instantly take me back to those joyful gatherings.
Why You’ll Love This Recipe
If you’re a fan of crispy, golden-brown pastries with a deliciously cheesy center, this recipe is for you! Whether you’re making these for a family dinner, a party snack, or a cozy weekend treat, they are guaranteed to be a hit. Plus, they’re super easy to customize—switch up the filling, try different cheeses, or even make a vegetarian version!
Trust me, once you try these, they’ll become a staple in your kitchen just like they did in mine. 💛
🥖 What You’ll Need
Before we start baking, let’s make sure you have all the necessary tools and ingredients ready. Having everything within reach will make the process smooth and enjoyable!
Essential Kitchen Tools
To achieve the perfect flaky, cheesy stuffed pastry, you’ll need:
- Rolling pin 🏺 – Helps roll out the dough evenly.
- Pastry brush 🖌️ – Essential for applying egg wash for that golden crust.
- Baking tray 🍽️ – A sturdy tray ensures even baking.
- Mixing bowls 🥣 – For preparing both the dough and filling.
- Sharp knife 🔪 – Helps cut dough into perfect squares.
If you want to make the process even easier, consider using a pastry cutter to get those edges just right or a food processor to mix the dough quickly!
Fresh Ingredients Matter
Using high-quality, fresh ingredients makes all the difference in creating a buttery, flaky crust and a flavorful filling. From the butter to the cheese, choose the best you can find. If possible, opt for grass-fed butter and freshly grated cheese instead of pre-shredded versions.
Now that we have everything ready, it’s time to gather our ingredients and start making this delicious pastry!
check out this for more Recipes : Quickly
📝 Ingredients
Gathering the right ingredients is the key to making these cheesy stuffed pastries turn out golden, crispy, and delicious. Here’s everything you’ll need for both the dough and the filling.
For the Dough
A perfect pastry starts with a flaky, buttery crust. You’ll need:
- 2 ½ cups all-purpose flour 🍞 – The base of the pastry.
- 1 tsp salt 🧂 – Enhances flavor.
- 1 cup unsalted butter (cold & cubed) 🧈 – Cold butter creates a flaky texture.
- ½ cup cold water ❄️ – Helps bind the dough without making it too sticky.
Why Cold Ingredients Matter
Cold butter and water are essential in pastry making. When the butter melts in the oven, it creates steam pockets, which give the pastry its signature light and flaky layers. If the butter gets too soft before baking, the dough may turn out dense rather than crispy.
For the Filling
Now, onto the star of the show—the rich, cheesy, and savory filling! You’ll need:
- 1 cup shredded mozzarella cheese 🧀 – For that irresistible gooey texture.
- ½ cup cheddar cheese 🧀 – Adds depth and sharpness.
- 1 cup cooked ground beef or chicken 🍖 – Provides a savory, hearty bite.
- ½ tsp black pepper 🌶️ – Adds a mild kick.
- ½ tsp garlic powder 🧄 – Enhances the filling’s flavor.
- ½ tsp dried oregano 🌿 – Brings an herby aroma to the mix.
- 1 egg (for egg wash) 🥚 – Helps achieve a golden, glossy crust.
Can You Customize the Filling? Absolutely!
If you prefer a vegetarian version, swap the meat for sautéed mushrooms and spinach. Want an extra kick? Add chili flakes or diced jalapeños. Experimenting with different cheeses like gouda, feta, or gruyère can also bring new flavors to your pastry!
Now that all our ingredients are ready, let’s move on to making the dough! 🥐
👩🍳 Instructions: How to Make Cheesy Stuffed Pastry
Now that we have all the ingredients ready, it’s time to put everything together and create these delicious, cheesy stuffed pastries. Follow these step-by-step instructions to ensure a golden, crispy, and flavorful result.
Step 1: Make the Dough
A good pastry starts with a well-prepared dough. Follow these steps for the perfect flaky crust:
Mix dry ingredients – In a large mixing bowl, combine 2 ½ cups all-purpose flour and 1 tsp salt.
Cut in the butter – Add 1 cup cold, cubed unsalted butter and use your hands or a pastry cutter to blend it into the flour until the mixture resembles coarse crumbs.
Add cold water gradually – Slowly pour in ½ cup cold water, mixing until a dough forms.
Chill the dough – Wrap the dough in plastic wrap and let it chill in the refrigerator for at least 30 minutes. This helps relax the gluten and ensures a flakier texture.
Pro Tip: Keep Everything Cold!
For the flakiest results, keep your butter and water as cold as possible. If your kitchen is warm, you can even place the flour in the fridge for 10 minutes before starting!
check out this for more Recipes : Quickly
Step 2: Prepare the Filling
While the dough is chilling, let’s prepare the delicious cheesy meat filling:
Cook the meat – In a skillet over medium heat, cook 1 cup of ground beef or chicken until browned. Drain any excess fat.
Season it well – Stir in ½ tsp black pepper, ½ tsp garlic powder, and ½ tsp dried oregano for extra flavor. Let the mixture cool slightly.
Add the cheese – Once the meat has cooled, mix in 1 cup shredded mozzarella cheese and ½ cup cheddar cheese. This prevents the cheese from melting too soon and creating a watery filling.
Want to Make It Vegetarian?
Swap out the meat for sautéed mushrooms and spinach, or try a mixture of roasted bell peppers and feta cheese for a Mediterranean twist!
Now that our dough is chilled and the filling is ready, let’s move on to assembling the pastries!
Assemble the Pastries
Now that we have our chilled dough and delicious filling ready, it’s time to assemble these golden, cheesy delights! This step is crucial for getting the perfect shape and ensuring the filling stays inside while baking.
Rolling & Cutting the Dough
Flour your surface – Lightly dust your work surface and rolling pin with flour to prevent sticking.
Roll out the dough – Take the chilled dough out of the fridge and roll it out to about ¼-inch thickness. Keeping it thin ensures a light, crispy texture.
Cut into squares – Using a sharp knife or a pastry cutter, cut the dough into 4×4-inch squares. You can make them larger or smaller depending on your preference.
Filling & Folding the Pastries
Add the filling – Spoon about 1 to 1.5 tablespoons of the cheese-meat mixture into the center of each square. Be careful not to overfill, or the pastries may burst open while baking!
Fold the pastry – Carefully fold one side over the filling to create a triangle or fold the opposite sides together to form a rectangle.
Seal the edges – Press the edges together firmly using a fork. This helps lock in the filling and gives the pastries a beautiful, crimped design.
Final Touch: Egg Wash for a Golden Finish
Prepare the egg wash – Beat 1 egg in a small bowl.
Brush the pastries – Using a pastry brush, lightly coat the top of each pastry with the egg wash. This step gives them a beautifully golden and glossy finish after baking.
Want Extra Crispiness?
For an even crispier crust, sprinkle a little sesame seed or grated Parmesan cheese on top before baking!
Now that our pastries are assembled, let’s move on to the final and most exciting step—baking them to perfection!
Bake Until Golden!
Now that our pastries are assembled and brushed with egg wash, it’s time to bake them to crispy, golden perfection! The right baking temperature and time will ensure a flaky, buttery crust with a gooey, cheesy filling.
Baking the Pastries
Preheat your oven – Set your oven to 375°F (190°C) and allow it to fully heat up before baking. A properly preheated oven ensures even cooking and a crispy texture.
Prepare the baking tray – Line a baking tray with parchment paper to prevent sticking and make cleanup easier.
Arrange the pastries – Place the assembled pastries on the baking tray, leaving at least 1 inch of space between each one to allow for proper air circulation.
How Long to Bake?
Bake for 20–25 minutes – Check at the 20-minute mark. The pastries should be golden brown with a crispy texture.
Look for the perfect crust – The edges should be slightly darker than the center, and the tops should have a glossy golden finish from the egg wash.
Cool slightly before serving – Once done, remove from the oven and let them rest for about 5 minutes before serving. The filling will be extremely hot right out of the oven!
Pro Tip: How to Get an Extra Crispy Crust
If you love extra crispy pastries, try baking them on the bottom rack for the first 10 minutes, then move them to the middle rack for the remaining time. This ensures even browning and a crunchy texture.
Now that our pastries are baked to golden perfection, let’s talk about nutrition and serving tips!
🥗 Nutrition Score & Serving Tips
Now that our golden, cheesy stuffed pastries are ready, let’s take a quick look at their nutritional value and the best ways to serve and store them.
Nutrition Score (Per Serving)
Here’s the estimated nutritional breakdown per pastry:
- Calories: 290 kcal
- Protein: 10g
- Carbohydrates: 28g
- Fat: 15g
- Fiber: 2g
How to Make It Healthier?
If you want a lighter version, try these tweaks:
Use whole wheat flour instead of all-purpose flour for extra fiber.
Reduce butter slightly and replace some with Greek yogurt for a lower-fat dough.
Swap ground beef for lean turkey or plant-based alternatives to cut down on saturated fat.
Use low-fat cheese instead of full-fat cheddar and mozzarella.
check out this for more Recipes : Quickly
Serving Suggestions
These pastries taste best when they’re warm and fresh out of the oven! Here are some delicious ways to serve them:
Best Pairings
🥣 With Dipping Sauce: Serve with marinara sauce, garlic aioli, or spicy sriracha mayo for extra flavor.
🥗 As a Side Dish: Pair with a light Greek salad or coleslaw for a balanced meal.
☕ With a Hot Drink: Enjoy with a warm cup of tea, coffee, or even spiced chai for a cozy treat.
Storage & Freezing Tips
Want to make these pastries ahead of time? Here’s how to store them properly:
Storing Leftovers
Refrigerate: Store in an airtight container in the fridge for up to 3 days.
Reheat: Warm them in a 350°F (175°C) oven for 5–7 minutes to restore crispiness.
Freezing for Later
Freeze Before Baking: Assemble the pastries, place them on a baking tray, and freeze until solid. Then transfer to a freezer-safe bag. Bake straight from frozen at 375°F (190°C) for 25–30 minutes.
Freeze After Baking: Allow the pastries to cool completely, then store them in a freezer bag. Reheat in an oven at 375°F for 10 minutes before serving.
Now that you know how to store and serve these pastries, let’s talk about some fun variations and customizations to make them even more exciting!
🌀 Variations & Customizations
One of the best things about this cheesy stuffed pastry recipe is how easy it is to customize! Whether you’re looking for a vegetarian version, a spicy twist, or a new cheese combination, there are endless ways to make this recipe your own.
1. Vegetarian Option: Meat-Free & Flavorful
Want to skip the meat? No problem! Replace the ground beef or chicken with these tasty alternatives:
Sautéed Mushrooms & Spinach – Adds an earthy, umami-rich taste.
Roasted Bell Peppers & Feta Cheese – A Mediterranean-inspired filling.
Mashed Sweet Potatoes & Black Beans – A hearty and nutritious twist.
Pro Tip:
Make sure to cook and drain any vegetables before adding them to the filling. This prevents excess moisture, which can make the pastries soggy.
2. Add a Spicy Kick 🌶️
Love a little heat? Spice things up by adding:
½ tsp red chili flakes or diced jalapeños to the filling.
A drizzle of hot sauce inside the pastry before sealing.
Pepper Jack cheese instead of mozzarella for extra spice.
3. Experiment with Different Cheeses 🧀
Mozzarella and cheddar are classic choices, but don’t be afraid to mix things up! Try:
Gouda – Adds a creamy, slightly smoky flavor.
Gruyère – A rich and nutty option that melts beautifully.
Feta or Ricotta – Perfect for a lighter, tangy twist.
4. Try a Sweet Version! 🍫
Who says stuffed pastries have to be savory? Turn this recipe into a dessert pastry by swapping out the filling for:
🍫 Nutella & Bananas – A chocolatey, creamy delight.
🍏 Apple Cinnamon Filling – A warm and cozy fall-inspired treat.
🍯 Cream Cheese & Honey – Light, creamy, and slightly tangy.
Now that we’ve explored fun variations, let’s answer some frequently asked questions to help you perfect this recipe!
❓ FAQs – Your Questions Answered!
Got questions about making the perfect cheesy stuffed pastries? Here are some common ones, along with expert tips to help you get the best results every time!
1. How do I make my stuffed pastries extra crispy?
Use cold butter – Keeping your butter cold when making the dough ensures a flaky, crispy texture.
Preheat your oven properly – Baking in a fully heated 375°F (190°C) oven is key to achieving a golden, crispy crust.
Brush with egg wash – A light coat of beaten egg gives the pastries a shiny, golden finish and adds crispiness.
2. Can I use store-bought dough instead of making it from scratch?
👉 Yes! Puff pastry or pre-made pie dough works great if you’re short on time. Simply roll it out, cut into squares, and follow the same filling and baking steps. For more guidance, check out this puff pastry baking guide.
3. What type of cheese works best for stuffed pastries?
Mozzarella is best for that classic stretchy, gooey texture.
Cheddar adds sharpness and extra flavor.
Gouda or Gruyère melts beautifully and gives a rich, creamy taste.
4. Can I freeze cheesy stuffed pastries for later?
👉 Yes! You can freeze the pastries before or after baking.
✅ Before baking – Freeze assembled, unbaked pastries in a single layer on a tray, then transfer to a freezer bag.
✅ After baking – Let them cool completely, then freeze in an airtight container. Reheat in a 375°F oven for 10 minutes before serving.
For more freezing and storage tips, check out this freezing guide.
Now that all your questions are answered, let’s wrap things up with a final conclusion!
💡 Conclusion
There you have it—the ultimate Golden Cheesy Stuffed Pastry Recipe! With its buttery, flaky crust and gooey, savory filling, this pastry is a true crowd-pleaser. Whether you’re making it for a family gathering, a cozy snack, or a holiday treat, it’s guaranteed to bring smiles to everyone at the table.
Why You’ll Love This Recipe Again & Again
Easy to make – Simple ingredients, step-by-step guidance, and customizable filling options.
Crispy & cheesy perfection – The perfect balance of crunch and melt-in-your-mouth goodness.
Make-ahead friendly – Store, freeze, and reheat whenever you need a quick snack or meal.
If you’ve never made homemade stuffed pastries before, now’s the time to try! Trust me, once you bake these golden beauties, they’ll become a staple in your kitchen just like they did in mine.